
To record with MSI Afterburner, open the program and click on the “Video” tab. You can enable the “Record on Fly” option and specify the recording settings, such as the file format and location, to save the recorded video.
Are you looking to record your gameplay or screen activity using MSI Afterburner? MSI Afterburner is a recognized and widely used graphics card overclocking utility with a built-in video recording feature. This tutorial will show you how to record with MSI Afterburner and tips for optimising your recording settings.
Why record with MSI Afterburner?
There are several reasons why you might want to record your gameplay or screen activity:
Share your gameplay with friends or videos on Youtube: You can showcase your skills and share your experiences with others by recording your gameplay and sharing it online.
Create a tutorial or guide: If you are an experienced gamer or tech enthusiast, recording your screen activity can be a great way to create a tutorial or guide for others.
Save your progress: Sometimes, it can be helpful to record your gameplay so that you can go back and review your progress or strategy later.
Whatever your reason for recording, MSI Afterburner video capture is easy to use and captures high-quality game footage in real-time.
Related Reading
- MSI afterburner not working on windows | How to fix the MSI afterburner not working at a startup?
- Does Graphics Card Affect the FPS in Gaming?
- EVGA Precision x1 Vs MSI Afterburner
- How To limit FPS With MSI Afterburner?
Step-by-step instructions To Record With MSI Afterburner
- Open MSI Afterburner
Double-click the MSI Afterburner icon on your desktop or search for it in the Start menu to open MSI Afterburner.

- Select the “Video” tab
Once MSI Afterburner is open, click on the “Video” tab at the top of the window.

- Enable the “Record” option
In the “Video” tab, you will see a section labelled “Video Recording.” To enable video recording, check the box next to “Record on Fly.”
- Configure the recording settings
Once you have enabled the “Record on Fly” option, you can specify the recording settings by clicking on the “Recording” button. This will open a new window where you can choose the file format, location or folder to save the recorded video and other recording options.
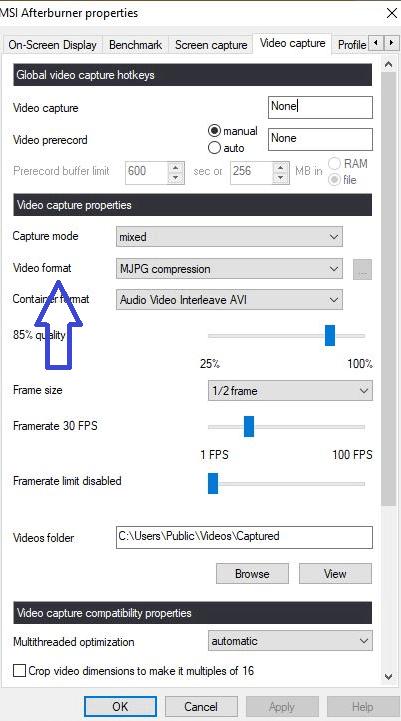
For the best results, we recommend using the MP4 file format and saving the recorded video to a location with plenty of free space. However, you can save files in mkv, avi format also. You may also want to consider adjusting the “Frame rate” and “Quality” settings to find a balance between file size and video quality.
- Start recording
Click the “Start” button in the “Video” tab to record. The MSI Afterburner recording indicator will turn red to indicate that the recording has started.
- Stop recording
To stop recording, click the “Stop” button in the “Video” tab. The recorded video will be saved to the location specified in the recording settings.
Also, Read
- How to Reset AMD Radeon Software? Easy Way to Factory Reset AMD Driver
- How To Check The CPU And GPU Temperature In Windows 11 Or 10?
- How Hot is too Hot for Gaming GPU? Good GPU Temperature Range
- CPUID HWMonitor Pro: Ultimate Guide To Understanding And Using This Powerful Tool
Conclusion
We hope this tutorial has helped you learn how to record with MSI Afterburner. Whether you are looking to share your gameplay with friends or create a tutorial, MSI
Afterburner makes it easy to capture high-quality videos of your screen activity, as afterburner’s the world’s most recognized and widely used tool.
If you enjoyed this tutorial, please comment and share it with your friends. Remember to experiment with the recording settings to find the optimal file size and video quality balance for your needs.
And remember, if you are experiencing any issues while recording, you can always check the MSI Afterburner user guide or seek help by sharing the screenshot.