
Press the F2 key. Select virtualization technology by pressing the Enter key on the Advanced tab, selecting the Advanced tab, and finally selecting the Advanced tab.
Virtualization technology is a powerful tool that allows you to run multiple virtual machines on a single physical host. To improve your virtual machines’ performance, you must enable virtualization in BIOS MSI.
This tutorial will show you how to enable virtualization in BIOS MSI in 2023. By following these instructions, you can take full advantage of your MSI motherboard’s virtualization capabilities.
Related Reading
- EVGA Precision x1 Vs MSI Afterburner
- How To limit FPS With MSI Afterburner?
- How To Record With MSI Afterburner?
- How To Unlock Core Voltage Using MSI Afterburner?
What you will need to follow in the tutorial: How To Enable Virtualization In Bios MSI
- An MSI motherboard
- A computer with the MSI BIOS chipset
- A keyboard and mouse
Step-by-step instructions: How To Enable Virtualization In Bios MSI
- Restart your computer and enter the BIOS
- Reboot your computer
- Press the “Delete” key on your keyboard to enter the BIOS
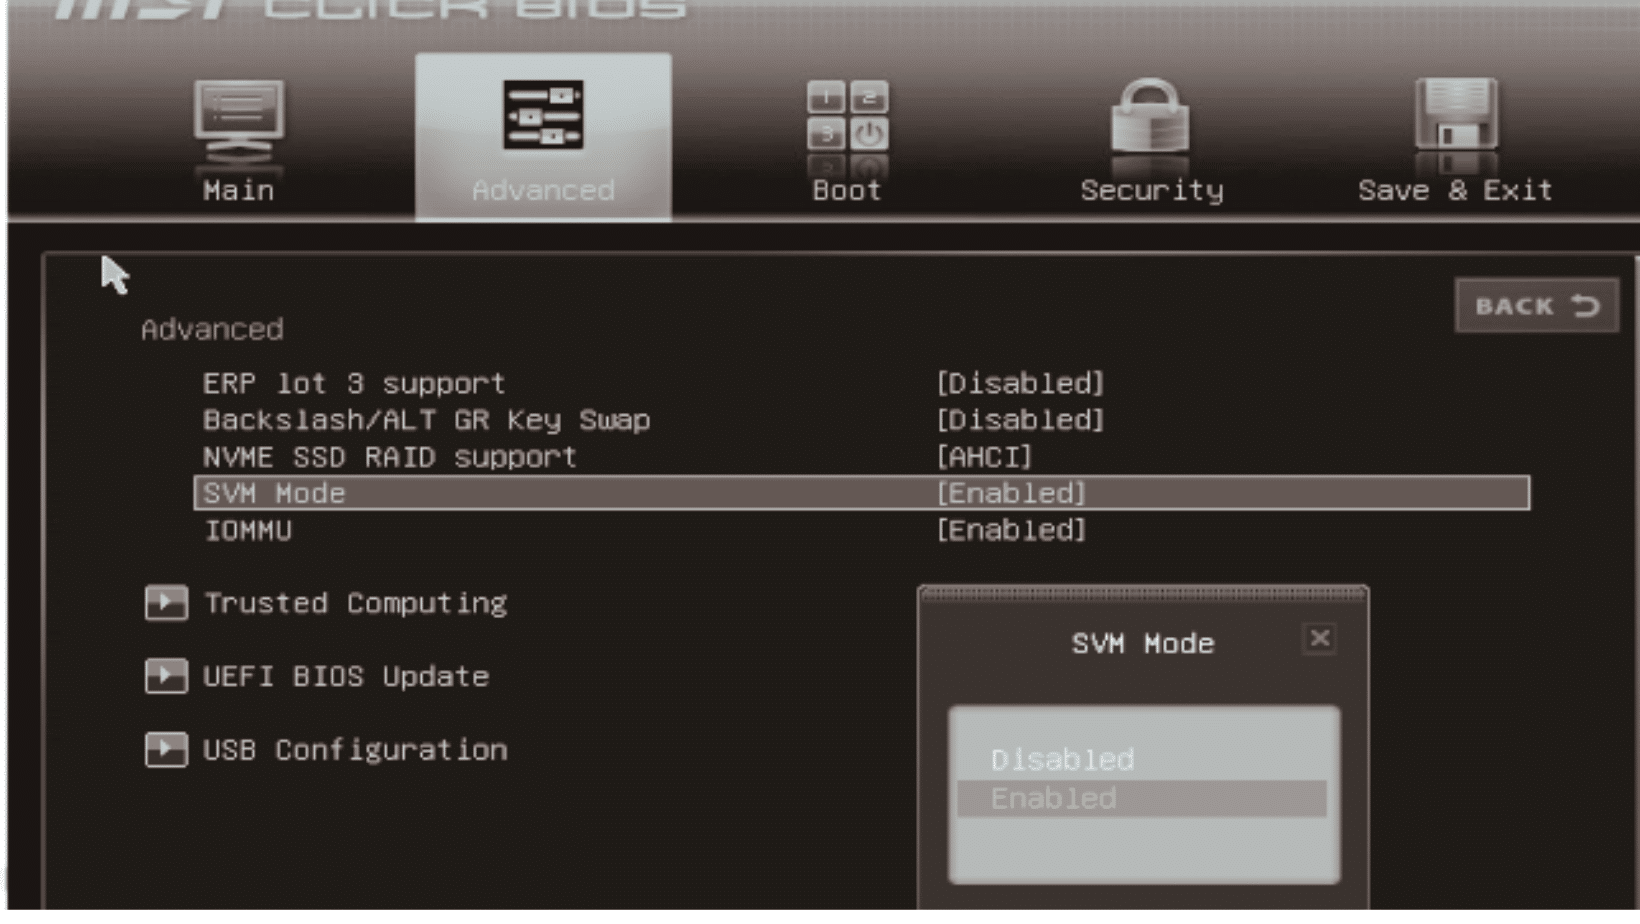
- Navigate to the “Advanced” tab IOMMU
- Use the arrow keys on your keyboard to navigate to the “Advanced” tab
- Press the “Enter” key to select the tab SVM Mode
- Navigate to the “CPU Configuration” sub-menu

- Use the arrow keys on your keyboard to navigate to the “CPU Configuration” sub-menu.
- Press the “Enter” key to select the sub-menu
- Enable virtualization
- Use the arrow keys on your keyboard to navigate the “Intel Virtualization Technology” option.
- Press the “Enter” key to select the option
- Use the arrow keys on your keyboard to change the setting to “Enabled.”
- Press the “F10” key to save the changes and exit the BIOS
Also, Read
- How To Change Input On MSI Monitor Step By Step?
- How To Overclock GTX 1070 With MSI Afterburner?
- How To Enable The Fps Counter In MSI Afterburner?
- How To Factory Reset The MSI Laptop?
Benefits Of Enabling Virtualization In BIOS MSI
Enabling virtualization in the BIOS of an MSI motherboard can provide several benefits, including:
- Improved performance: Virtualization allows multiple operating systems to run on a single physical machine, improving the system’s overall performance.
- Increased flexibility: Enabling virtualization allows you to run multiple operating systems on one machine, which can increase the flexibility of your system.
- Improved security: Virtualization can improve security by isolating different operating systems and applications from each other, making it more difficult for malware to spread or for hackers to gain access to sensitive information.
- Better resource utilization: Virtualization can allow you to utilize the resources of a single physical machine, making it more cost-effective.
- Testing and development: Virtualization allows developers to test software on multiple operating systems and configurations without maintaining multiple physical machines.
- Improved disaster recovery: Virtualization can enable faster and more efficient disaster recovery by allowing you to restore virtual machines to different physical machines quickly.
Also, Read
- How To Overclock GTX 1070 With MSI Afterburner?
- Best Way to Maximize Crypto Mining Profitability?
- How To Open MSI Files On Mac [100% Working Method]
- Do I Need a Graphics Card If I Don’t Play Games?
- How to Confirm if Crypto Mining Rig Is Online
Conclusion
We hope you found this tutorial helpful in learning how to enable virtualization in BIOS MSI in 2023. With virtualization technology enabled, you can take full advantage of your MSI motherboard’s capabilities and improve the performance of your virtual machines.
Let us know in the comments if you have any questions or if you enjoyed the tutorial. Remember to share it with your friends if you find it helpful.
Frequently Ask Questions:
How To Enable/Disable AMD virtualization in BIOS?
- The process for enabling or disabling AMD virtualization in the BIOS menu can vary depending on your specific motherboard and BIOS version. However, the general steps to follow are:
- Turn on your computer and press the BIOS setup utility’s key. This key is usually Del, F2, or Esc, but it may vary depending on your computer.
- Use the arrow keys to navigate to the Advanced or CPU Configuration menu.
- Look for an option called “AMD-V” or “AMD Virtualization” and set it to “Enabled” or “Disabled” as desired. The exact name of the option may vary depending on the BIOS version and manufacturer.
- Save the changes and exit the BIOS setup utility.
- Restart your computer for the changes to take effect.
Note: It’s always recommended to check your motherboards manual and the manufacturer’s website for instructions specific to your motherboard.