
The GPU fan speed is the rate at which a cooling fan attached to a Graphics Processing Unit (GPU) rotates.
Maintaining a certain fan speed is important to ensure the GPU does not overheat and become damaged.
If the fan speed is too low, it can increase the temperature of the GPU and cause it to fail. That’s why users need to adjust their GPU fan speeds.
The most common way to increase GPU fan speed is using software such as MSI Afterburner or EVGA Precision X1. Which allows users to adjust the fan speed settings on their GPUs.
How to Adjust the Speed of Graphics Card’s Fan Using Software? (Nvidia, AMD)
Controlling the GPU fan speed with software can be an effective way to keep your graphics card cool. Most GPUs, including NVIDIA and AMD, have their software designed to control the fan speed of your GPU.
The popular software is NVIDIA Control Panel, MSI Afterburner, and EVGA Precision XOC.
Using this software, you can check the temperature of your GPUs and control the fan speed. This makes it easier to maintain a healthy temperature for your GPUs while low noise levels.
MSI Afterburner:
MSI Afterburner is a well-known tool that many people use to change the GPU fan speed on their computers.
It is compatible with various graphics cards and comes with various extra choices.
Step By Step Guide:
- Install MSI Afterburner.
- To adjust the settings, use the gear symbol.
- Select the Fan tab from the menu.
- Choose the option that allows users to configure the controls for the fan.
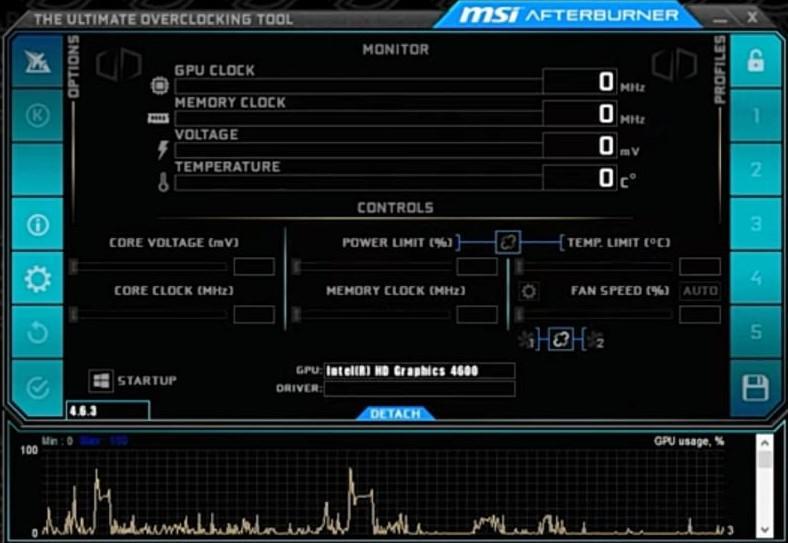
- You should now be back on the main screen.
- Deactivate the setting that controls the fan automatically.
- Simply dragging the slider up will make the fan run faster, and dragging it down will slow it down.
- To save, select the symbol that looks like a floppy disk.
EVGA Precision X1:
Users that have EVGA graphics cards have another software option available to them called EVGA Precision X1.
- The precision X1 launcher.
- To deactivate the automatic fan controls, you need to click the symbol that reads “Auto.”
- changing-fan-speed-on-precision-x1
- Move the sliders corresponding to each fan until they reach the speed you want them to operate.
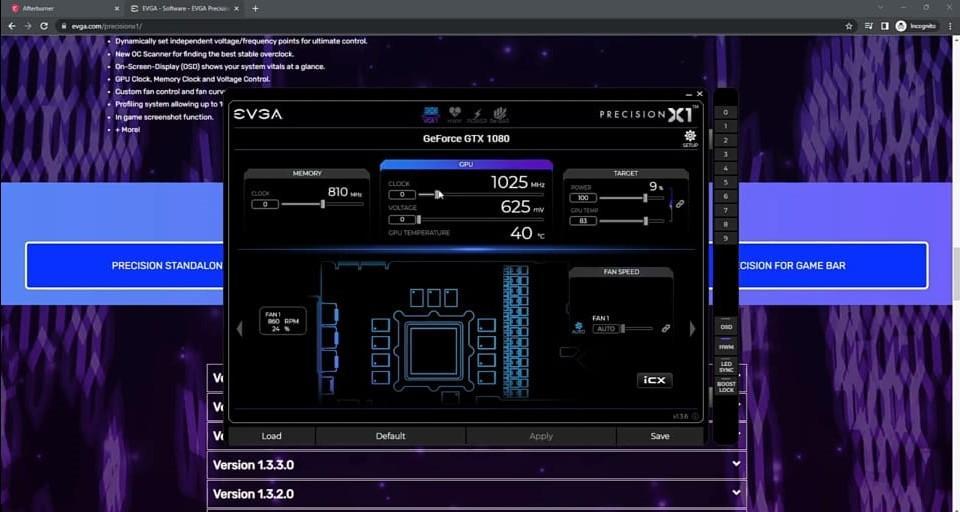
After you have set it to adjust manually and moved the sliders into place, the fans should alter. So that they correspond to the settings you have chosen.
So, some individuals claim that after they exit Precision X1. Their individualized settings are no longer put into effect.
Turn up the speed of your fans all the way, and then listen to get a sense of what they sound like in that setting.
Turn off the software and listen to see whether the sounds have changed.
AMD’s Radeon Watt Man:
AMD Radeon Watt Man may reduce the power consumption of your AMD graphics card.
The fan speed is one of the customizable options. You must first download and install the necessary software to complete these actions.
- Choose “Set as Background” from the context menu.
- Make a selection in AMD Radeon Settings.
- To access this section, click the Games menu.
- Go to Preferences > Worldwide.
- AMD-RADEON-global-settings.
- Choose the World Watt Man.
- Select “Speed/Temperature as Manual” from the menu at the bottom left of the screen.
- To raise the fan speed at the selected temperature, click and drag the dots on the line upward.
- Adjusting-fan-speed-on-AMD-Radeon-graphics-card.
To reduce the fan speed at a given temperature, click and drag down the dots on the line.
Also, in the bottom left, you’ll see the option to engage in Zero RPM mode. It will reduce fan speed to reduce noise when the GPU is not working.
Related Reading:
- How to Clean Your GPU? Simple Steps to Clean a Graphic Card
- How To Check If Your GPU Is Working Or Not?
- Why does Your GPU Usage drop To Zero During Gameplay?
- Is GPU Water Cooling Worth It? Let’s Find Out.
Why does GPU Fan Speed Matter?
Increasing fan speed will help improve cooling performance and save GPUs from overheating. During intensive gaming sessions or other heavy workloads.
It’s also worth noting that some GPUs come with automatic overclocking capabilities.
This allows them to increase their fan speeds to keep temperatures under control.
What Is the Ideal Fan Speed for My Graphics Card?
The ideal fan speed for your graphics card depends on several factors. Such as the type of tasks you are doing and the temperature of your system.
If you are using your graphics card for more intensive tasks like gaming or video editing. You will want to set the fan speed higher to keep temperatures down.
A lower fan speed may be enough if you use it for everyday tasks like browsing the web.
Using automatic fan control is the best way to determine what is suitable for your system. Which adjusts the fan speed based on how hard your graphics card works.
This will ensure that the fan speed is always optimal and keep temperatures safe.
How Do I Check My Gpu Fan Speed Windows 10?
Checking your GPU fan speed on Windows 10 is a simple process. If you have a high-end GPU, you can use custom fan control to adjust the fan speed of your graphics card.
MSI Afterburner is one of the most popular tools for this purpose. It allows users to create a custom fan curve for their GPUs.
This allows the fans to run at higher speeds when the GPU runs at higher loads.
You can use other software such as EVGA Precision X1 or Gigabyte’s Aorus Graphics Engine.
All these software allow you to adjust the fan speed manually or set up a custom profile. It will automatically adjust the fan speed depending on how much load your GPU is under.
Checking your GPU fan speed is important to ensure that it isn’t running too hot and causing any damage.
How do you adjust GPU fans?
Adjusting GPU fans is important to keep your graphics card from overheating.
To adjust the fan speed, first, you must ensure that the GPU is installed on your computer.
Then, you can set the fan speed by using software that comes with the GPU or through your BIOS settings.
Once you set the fan speed, you can adjust it as needed depending on how hot your GPU is running.
How do I control individual Graphics Card Fans?
Controlling individual GPU fans is a great way to ensure your graphics card runs. Depending on your GPU type, different methods for controlling fan speed exist.
For example, if you have an MSI graphics card. Then MSI Afterburner is the best tool for tweaking and overclocking your fan control.
EVGA also has its software suite that can use to adjust fan speeds as well. Both of these programs allow you to customize fan curves.
And adjust speeds depending on your needs. With these tools, you can control each GPU fan. and make sure they run at the optimal speed for high performance.
How do I control the GPU fan speed on the motherboard?
Controlling the GPU fan speed on your motherboard is a great way to keep your system running cool. You will need to access the fan control settings to control your GPU’s fan speed.
You can create a custom fan curve to set the desired speed for each temperature range.
MSI Afterburner is a great tool for controlling GPU fan speeds and creating custom fan curves. Afterburner allows you to adjust the RPMs of your fans.
As well as check temperatures and other parameters in real time. With these tools, you can control the GPU fan speed on your motherboard. And create a custom fan curve that works best for your system.
Related Reading:
- How To Quiet Your Graphics Card Fans For A Peaceful Gaming
- Gpu fans not Spinning At startup
- Will Graphic Card Work Without Drivers?
What RPM should my GPU fan be?
When determining what RPM your GPU fan should be, there are a few important factors to consider.
First, you must consider the make and model of your graphics card. Different GPUs may need different fan speeds for optimal performance.
Additionally, it would help if you also considered the temperature of your GPU. If running too hot, you may need to increase the RPM of your fan to keep it cool.
Finally, it would help if you looked at any fan control settings available on your GPU. These can help you adjust the speed of your fan according to your needs.
How can I control my fan speed without BIOS?
Controlling the fan speed without BIOS can complete by using your motherboard. Most motherboards have a built-in way of controlling fan speed.
You will need to access the motherboard’s BIOS settings to do this. This can often perform by pressing a certain key when your computer is booting up, such as F2 or DEL.
Once in the BIOS settings, look for an option that says “Fan Speed Control” or “Fan Settings.”
From there, you can adjust the fan speed as desired. Be sure to save your changes before exiting the BIOS menu.
This should allow you to control your fan speed without relying on BIOS settings.
What Software Can I Use To Control My Gpu Fan Speed?
There are several software solutions available when it comes to controlling the fan speed of your GPU.
MSI Afterburner is one of the most popular graphics card fan control. It allows users to adjust the fan speed of their GPU to achieve optimal cooling performance.
Additionally, MSI Afterburner also provides features such as monitoring and overclocking capabilities.
Making it a great all-in-one solution for anyone looking to get the most out of their GPU. With its intuitive user interface and easy-to-use features.
MSI Afterburner is an excellent choice for controlling your graphics card’s fan speed. furthermore, if you’re looking for more advanced features, other third-party software solutions.
Like EVGA Precision X1 or ASUS GPU Tweak II can provide customization options for your GPU fan speed.
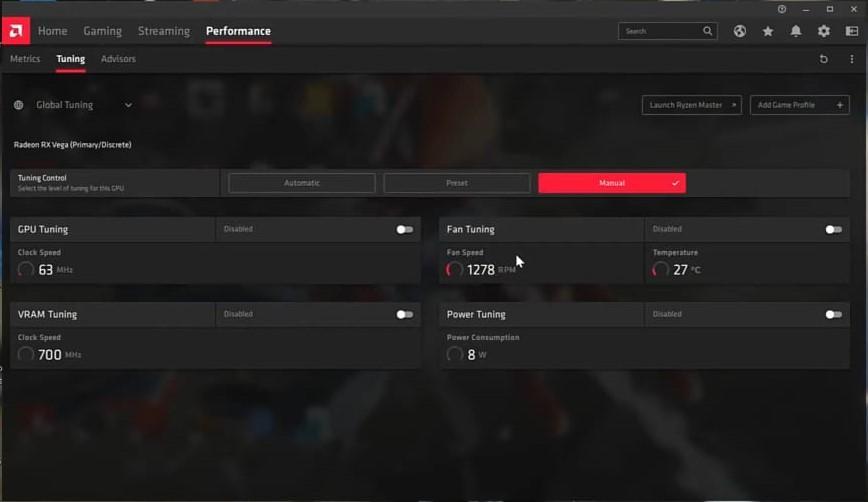
How to control GPU fan speed AMD?
If you have an AMD GPU, you can control the fan speed to ensure your system is running. To do this, you’ll first need to download and install the AMD Radeon software.
Once installed, open the program and select ‘Performance’ from the left-hand side menu. Click on ‘Fan Speed’ and adjust the fan speed slider to your desired level.
You can also select a pre-defined profile. The hat will adjust the fan speed based on your GPU’s temperature.
It’s important to note that adjusting your fan speed is. It may cause extra noise, but it can also help keep your GPU cool and prevent overheating.
How to control GPU fan speed in Linux?
Controlling your GPU fan speed in Linux can be a great way to keep your system cool. The first step is to install the necessary software, such as lm-sensors.
Which will allow you to adjust the fan speed of your graphics card. Once installed, you can use a command line tool such as nvidia-settings or xorg. Conf to change the settings of your GPU fan speed.
You can also use a GUI application. Such as Nvidia X Server Settings or AMD Catalyst Control Center to make the adjustments.
To ensure that your settings apply. It is important to restart your computer after making any changes. With these tools, you can control the fan speed of your GPU for cooling and performance in Linux.
What controls GPU fan speed?
The GPU fan speed controls the graphics card’s temperature. When the card heats up, the fan speed increases to cool it down and vice versa.
A thermal sensor usually regulates the fan speed, which monitors the card’s temperature and adjusts the fan speed.
This helps to ensure that your graphics card does not overheat. And keeps it running at optimal performance. Most modern GPUs also have software that allows you to adjust the fan speed.
If you want to tweak it for better cooling or quieter operation. For fan speed, you can also use third-party programs like MSI Afterburner or EVGA Precision X1.
Do BIOS control GPU fan speed?
Bios, or Basic Input Output System, is the software that controls how your computer boots and runs. It handles initializing all the hardware components of your computer. Including the GPU fan speed.
Bios has a “Fan Control” feature, which allows you to set the fan speed of your GPU. For example, if you are running a graphics-intensive game.
Then, set the fan speed higher to keep your GPU cool. If you are browsing the internet, set it to lower, so it does not generate too much noise.
In either case, Bios can help you control the fan speed of your GPU. To achieve optimal performance and temperature levels.
Why is my GPU fan speed 0 rpm?
If your GPU fan speed is 0 rpm, it could be a few different things. It is possible that the fan itself broke and needs to replace.
It could also be that your motherboard needs to adjust to allow the GPU fan speed to increase. If the fan speed is not increased, your GPU can overheat.
And cause damage to other components in your computer. You can access the BIOS menu on your motherboard to adjust the fan speed.
Or use a third-party program like MSI Afterburner or EVGA Precision XOC. Once you’ve adjusted the settings, you should see an increase in your GPU fan speed. And improved cooling performance for your system.
What is a good GPU fan RPM? Increase GPU Fan Speed
A good GPU fan’s RPM (revolutions per minute) depends on the type of graphics card you have. Generally, a higher fan RPM is better for cooling your GPU.
As it will help keep your graphics card running at optimal temperatures. A good range for most GPUs is between 2000 and 3000 RPM.
Although some high-performance GPUs may need higher fan speeds. It’s essential to ensure your fan speed is high enough.
As this can lead to overheating and damage to your graphics card. Additionally, setting the fan speed too high can be noisy and draw more power than necessary. The best way to determine what’s right for your GPU is to consult your manufacturer. Or check online resources for information about recommended fan speeds.