
“How many cores does my CPU have?” Open the System Information Tool, Find the Processor Information, Check the Number of Cores, and Confirm the Core Count.
A CPU’s core count is the number of processing units or CPUs within the chip. The answer to this question can vary based on the CPU’s make and model, with some processors featuring only a single core while others may have 16 or more cores.
Discovering the number of CPU cores can be essential to understanding your computer’s performance capabilities. Whether you are a gamer or a power user, having a clear idea of the number of CPU cores can help you make informed decisions about software and hardware upgrades.
In this article, we will show you how to check the number of cores your CPU has and why it is essential to know this information.
What You Will Need to Follow the Tutorial: How many cores does my CPU have?
To follow this tutorial, you will need the following:
- A computer with a CPU that you want to check the core count of
- Access to your computer’s operating system
- Basic computer skills
There are various methods to check the core count of your CPU. Still, we recommend using the System Information tool available in all modern versions of Windows as it provides comprehensive information about your computer’s hardware and software.
Related Read
- What is CPU Virtualization Technology?
- How To Install Windows 11 on an Unsupported CPU?
- What Socket Type is Soldered To The Motherboard, Along With The CPU?
Step-by-Step Instructions: How many cores does my CPU have?
- Open the System Information Tool

Click the Windows Start button and type “System Information” in the search bar. Click on the System Information app to launch it.
- Find the Processor Information
Scroll down to find the “Processor” entry on the System Information screen. Click on the “+” icon to expand it.
- Check the Number of Cores
In the Processor entry, you will see a “Cores” field showing the number of cores your CPU has. If the value shows “2,” it means your CPU has two cores, and so on.
- Confirm the Core Count
If you have a multi-core processor, you can confirm the core count by looking at the “Logical Processor Count” field in the duplicate Processor entry.
Find the Number of Cores in the Windows CPU
To find the number of cores in your Windows CPU, you can follow these steps:
- Press the Windows key + R on your keyboard to open the Run dialog box.
- Type “msinfo32” (without quotes) in the Run dialog box and press Enter.
- Scroll down to the “Processor” section in the System Information window that appears.
- Look for the “Number of Cores” entry in the Processor section. The value next to this entry will tell you the number of physical cores in your CPU.
Alternatively, you can also check the number of logical cores (including hyperthreaded cores) in your CPU using the Task Manager:
- Right-click on the taskbar and select Task Manager from the context menu.
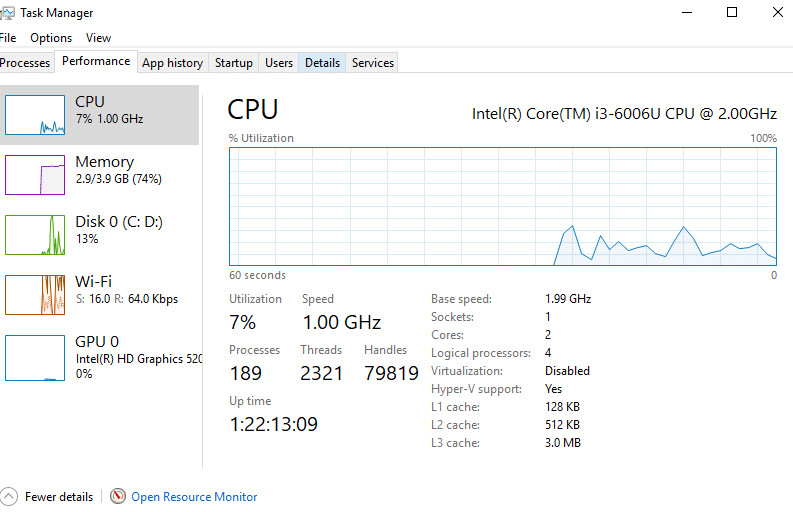
- Click on the Performance tab in the Task Manager.
- Look for the CPU section in the Performance tab and click on it to expand.
- You will see the number of logical cores (including hyperthreaded cores) listed under the “Logical processors” entry.
Also, Read
- What CPU Does The Ps5 Have?
- How to Upgrade Your Laptop CPU for More Power?
- How To Check What CPU I Have?
Find the Number of Cores in the Mac CPU
To find the number of cores in a Mac CPU, you can follow these steps:
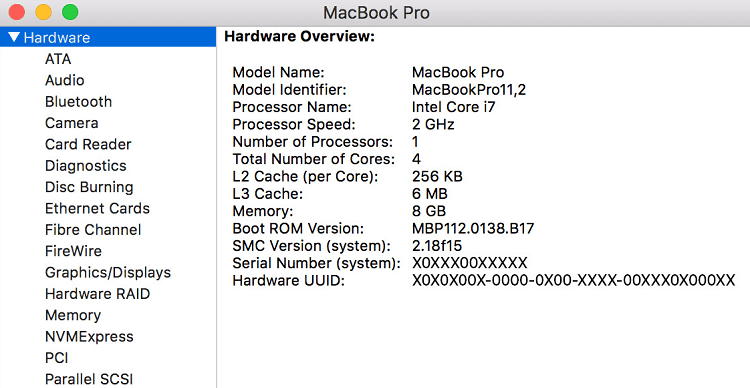
- Click on the Apple menu in the top left corner of your screen.
- Select “About This Mac” from the drop-down menu.

- In the window that appears, click on “System Report.”
- Scroll down the System Information window’s left side and click “Hardware.”
- On the right-hand side of the window, you should see information about your CPU. Look for a line that says “Total Number of Cores.” This will tell you how many cores your Mac’s CPU has.
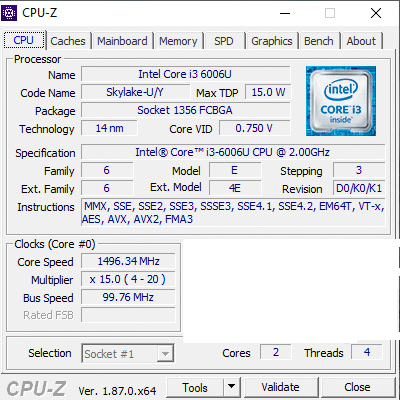
Alternatively, you can use a third-party app like “CPU-Z” to get detailed information about your Mac’s CPU, including the number of cores.
Also, Read
- What Are The Best Places To Buy PC Parts, CPUs & Graphics Cards Online?
- How to Remove a CPU Cooler or Fan Without Damaging the Motherboard?
- What is a CPU (Central Processing Unit)? What CPU Stands For?
Benefits of Checking CPU Core
Checking the CPU core can have several benefits, including:
- Performance optimization: By checking the CPU core, you can determine your processor’s number of cores and clock speeds. This information can help optimize your system’s performance by allocating tasks to the appropriate cores and adjusting clock speeds.
- Overclocking: If you are interested in overclocking your CPU, checking the CPU core is essential. Overclocking involves increasing the clock speed of your CPU to improve performance, but it can also lead to instability and overheating. Checking the CPU core can help you determine the safe overclocking limit for your processor.
- Troubleshooting: If your computer is running slow or experiencing crashes, checking the CPU core can help you identify the cause of the problem. For example, if one of the cores is not functioning correctly, it could be causing performance issues.
- Compatibility: Checking the CPU core is essential when upgrading or building a computer. You must ensure the CPU is compatible with your system’s motherboard and other components.
Overall, checking the CPU core can help you optimize your system’s performance, troubleshoot problems, and ensure compatibility when upgrading or building a computer.
Conclusion
Knowing the number of cores your CPU has can help you determine its processing power and enable you to make informed decisions when upgrading hardware or software. We hope this tutorial has helped you discover your CPU’s core count.
Please let us know your thoughts in the comments section below, and remember to share this article with others who may find it helpful. If you want to upgrade your computer’s hardware, check out our premium offers for deals and discounts.