
Download the Windows 11 ISO, Create a bootable USB drive, Press the appropriate key (usually F2 or Delete), Disable secure boot, Insert the USB drive, Press the appropriate key (usually F12 or Esc), Follow the on-screen instructions, restart, AND Disable legacy boot and enable secure boot.
How to install Windows 11 on an unsupported CPU has been a hot topic since the release of the latest operating system from Microsoft. Many users with older CPUs have been left out of the upgrade loop due to compatibility issues.
In this article, we will show you how to install Windows 11 on an unsupported CPU to enjoy all the benefits of the latest operating system. By following our guide, you’ll have a fully functional Windows 11 installation on your computer in no time.
Related Read
- What Are The Best Places To Buy PC Parts, CPUs & Graphics Cards Online?
- How To Check Cpu? (And How Fast it is)
- How to Remove a CPU Cooler or Fan Without Damaging the Motherboard?
What Will You Need: How To Install Windows 11 on an Unsupported CPU?
To follow this tutorial, you will need the following:
- A Windows 11 ISO file
- Rufus or a similar tool to create a bootable USB drive
- A computer with an unsupported CPU
- A BIOS that allows you to disable secure boot and enable legacy boot
There are alternative methods to install Windows 11 on an unsupported CPU, such as an insider preview or a virtual machine. However, we recommend the method presented in this tutorial for the best user experience.
Step-by-Step Instructions: How To Install Windows 11 on an Unsupported CPU?
- Download the Windows 11 ISO file from the Microsoft website or a trusted source.
- Create a bootable USB drive using Rufus or a similar tool. Follow the instructions provided by the software.
- Press the appropriate key (usually F2 or Delete) to turn on your computer and access the BIOS settings.
- Disable secure boot and enable legacy boot in the BIOS settings. Save and exit.
- Insert the USB drive with the Windows 11 installation files into your computer and restart.
- Press the appropriate key (usually F12 or Esc) to access the boot menu and select the USB drive as the boot device.
- Follow the on-screen instructions to install Windows 11 on your computer.
- Once the installation is complete, restart your computer and reaccess the BIOS settings.
- Disable legacy boot and enable secure boot in the BIOS settings. Save and exit.
- Congratulations! You have successfully installed Windows 11 on an unsupported CPU.
Also, Read
- How to Clean A CPU Fan Of Your Computer System in 5 Simple Steps?
- How To Install A Liquid Cooling System (AIO) On Your CPU?
- What is a CPU (Central Processing Unit)? What CPU Stands For?
Other Possible Way To Install Windows 11
Use WinPass11 or Force-Windows-11-Install
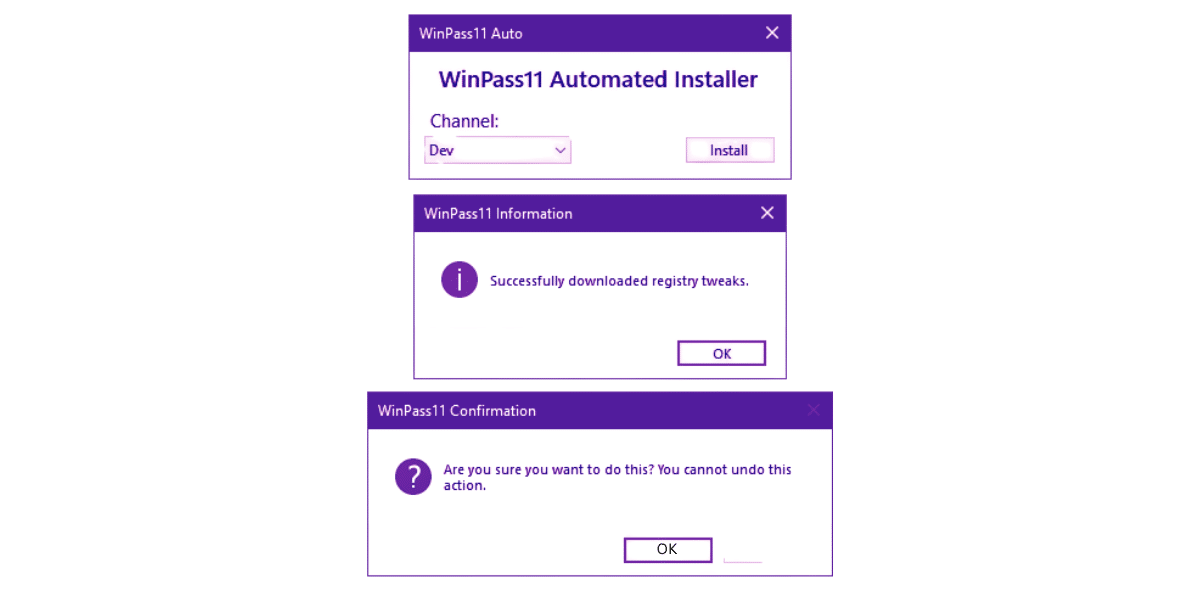
WinPass11 and Force-Windows-11-Install are third-party patches that modify the installation files of Windows 11, allowing you to bypass Microsoft’s hardware restrictions and install Windows 11 on unsupported hardware.
Here are the steps to use these patches:
- Download WinPass11 or Force-Windows-11-Install from a reputable source.
- Extract the contents of the downloaded file to a folder on your computer.
- Run the “WinPass11.bat” or “Force-Windows-11-Install.bat” file as an administrator.
- Follow the prompts in the command prompt window to install Windows 11.
- During installation, you may see warnings or errors related to safely ignoring these and continuing.
- Once the installation is complete, you may need to install additional drivers for your hardware to ensure proper functionality.
It’s important to note that using third-party patches to install Windows 11 on unsupported hardware can compromise the stability and security of your system.
Additionally, this method may only work for some hardware configurations, and you may encounter issues with drivers or other system components. Therefore, it’s recommended to proceed cautiously and only uses this method as a last resort.
Also, Read
- How to lower CPU usage on Windows 10?
- How to Apply Thermal Paste to a CPU? (A Step-by-Step Guide)
- CPU vs. GPU Rendering – What’s the difference, and which should you choose?
Edit Registry to Bypass CPU and TPM Check
Another method to install Windows 11 on unsupported hardware is to modify the registry to bypass the CPU and TPM check performed during installation.
Here are the steps to do so:
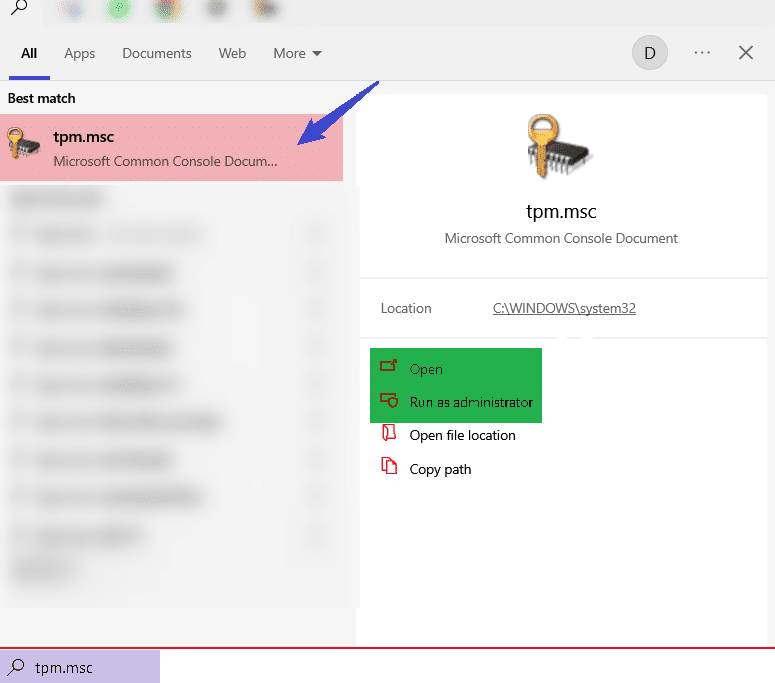
- Press the Windows key + R to open the Run dialog box.
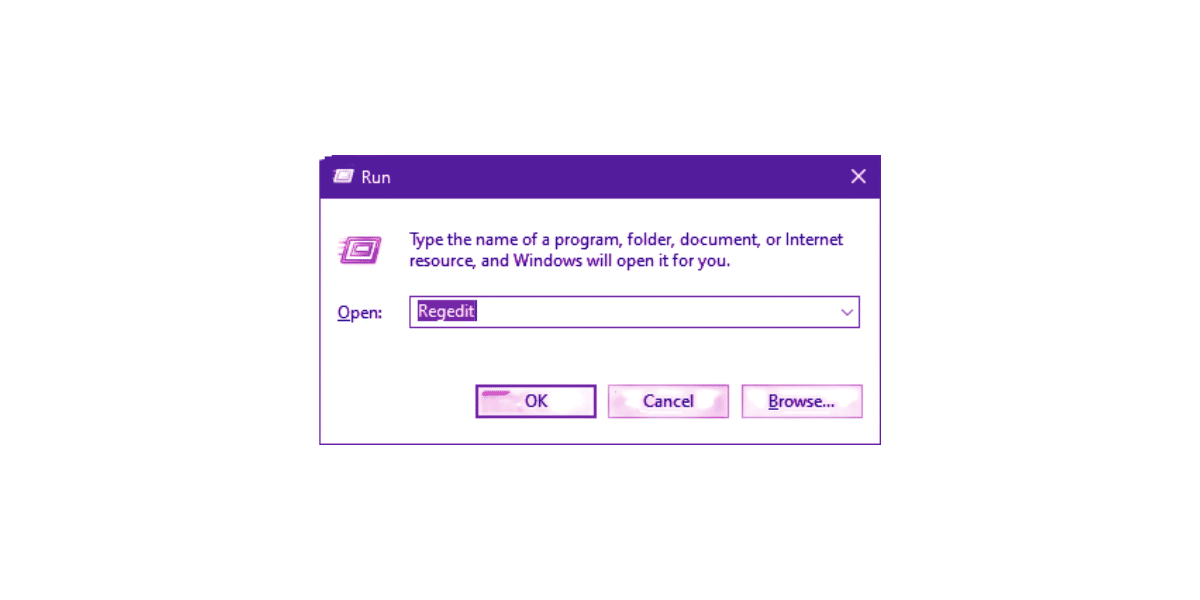
- Type “regedit” and press Enter to open the Registry Editor.
- Navigate to HKEY_LOCAL_MACHINE\SYSTEM\Setup\MoSetup.
- Right-click on the MoSetup folder and select New > DWORD (32-bit) Value.
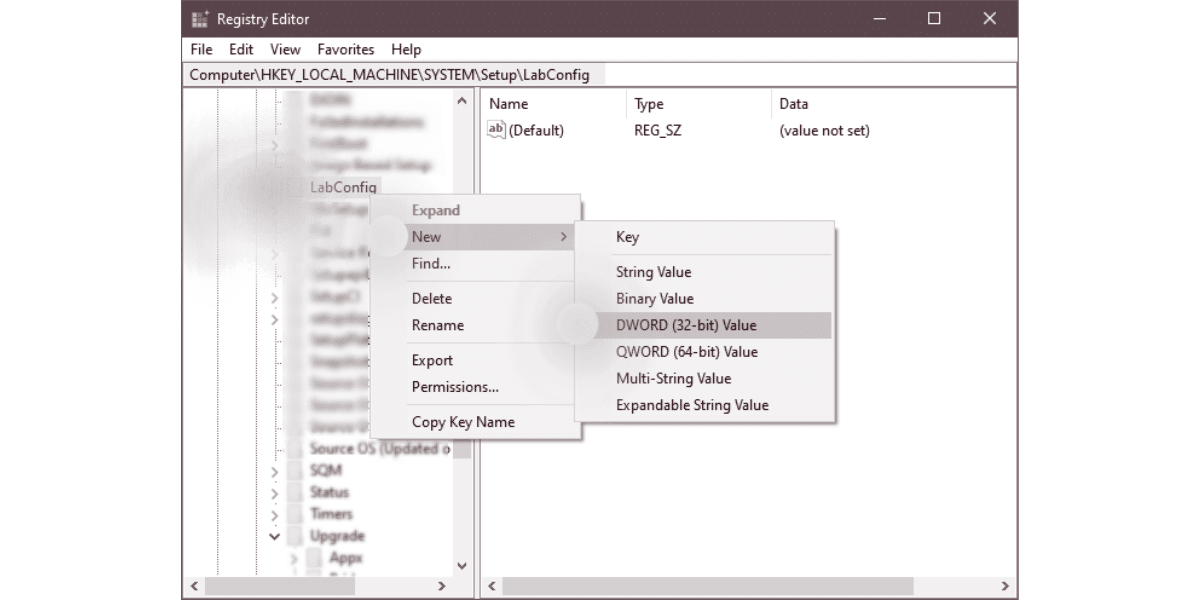
- Name the new DWORD “AllowUpgradesWithUnsupportedTPMOrCPU” and set its value to 1.
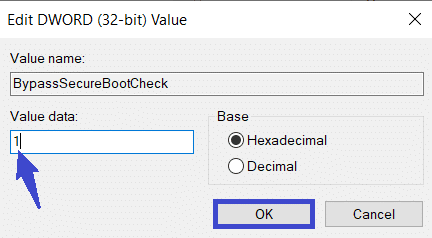
- Close the Registry Editor.
- Download the Windows 11 installation media from the official Microsoft website.
- Create a bootable USB drive or DVD using the installation media.
- Boot your computer from the USB drive or DVD.
- Follow the prompts to install Windows 11.
You may still see warnings or errors related to unsupported hardware during installation. You can safely ignore these and continue with the installation.
It’s important to note that modifying the registry can cause stability issues and may void your warranty. Additionally, this method may only work for some hardware configurations, and you may encounter issues with drivers or other system components.
Therefore, it’s recommended to proceed cautiously and only uses this method as a last resort.
Enable TPM 2.0 from UEFI to Install Windows 11
Windows 11 requires a Trusted Platform Module (TPM) version 2.0 or higher to be enabled on the system. Some computers have TPM 2.0 disabled in the UEFI/BIOS settings, which can prevent the installation of Windows 11.
Enabling TPM 2.0 from the UEFI/BIOS settings can allow you to install Windows 11 on unsupported hardware. Here are the steps to do so:
- Restart your computer and enter the UEFI/BIOS settings.
- Look for the TPM setting in the Security or Advanced tab.
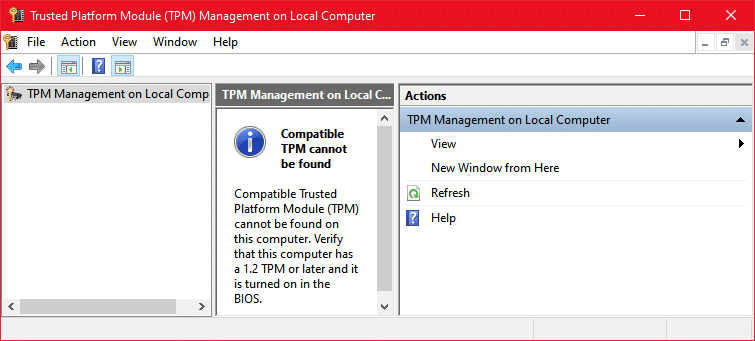
- If the TPM setting is disabled, enable it.
- Save the changes and exit the UEFI/BIOS settings.
- Download the Windows 11 installation media from the official Microsoft website.
- Create a bootable USB drive or DVD using the installation media.
- Boot your computer from the USB drive or DVD.
- Follow the prompts to install Windows 11.
You may still see warnings or errors related to unsupported hardware during installation. You can safely ignore these and continue with the installation.
It’s important to note that enabling TPM 2.0 from the UEFI/BIOS settings may not be possible on all computers, as some older hardware may not support TPM 2.0. Additionally, enabling TPM 2.0 may cause issues with other software or hardware on your system.
Therefore, it’s recommended to proceed cautiously and only uses this method if your computer supports TPM 2.0 and you’re comfortable changing the UEFI/BIOS settings.
Also, Read
- Boosting V-Ray Benchmark Efficiency: Analyzing CPU and GPU Scores for Optimal Performance
- Does Overclocking Reduce Lifespan of CPU or GPU?
- Best Motherboards for AMD Ryzen 5000 Series CPUs 5950X, 5900X, 5600X
Install Windows 11 without TPM Using Rufus
If your computer doesn’t have a TPM or TPM 2.0 enabled in the UEFI/BIOS settings, you can still install Windows 11 using Rufus, a third-party tool for creating bootable USB drives. Here are the steps to do so:
- Download Rufus from the official website and install it on your computer.
- Download the Windows 11 ISO file from the official Microsoft website. Open Rufus and select the USB drive you want to install Windows 11.
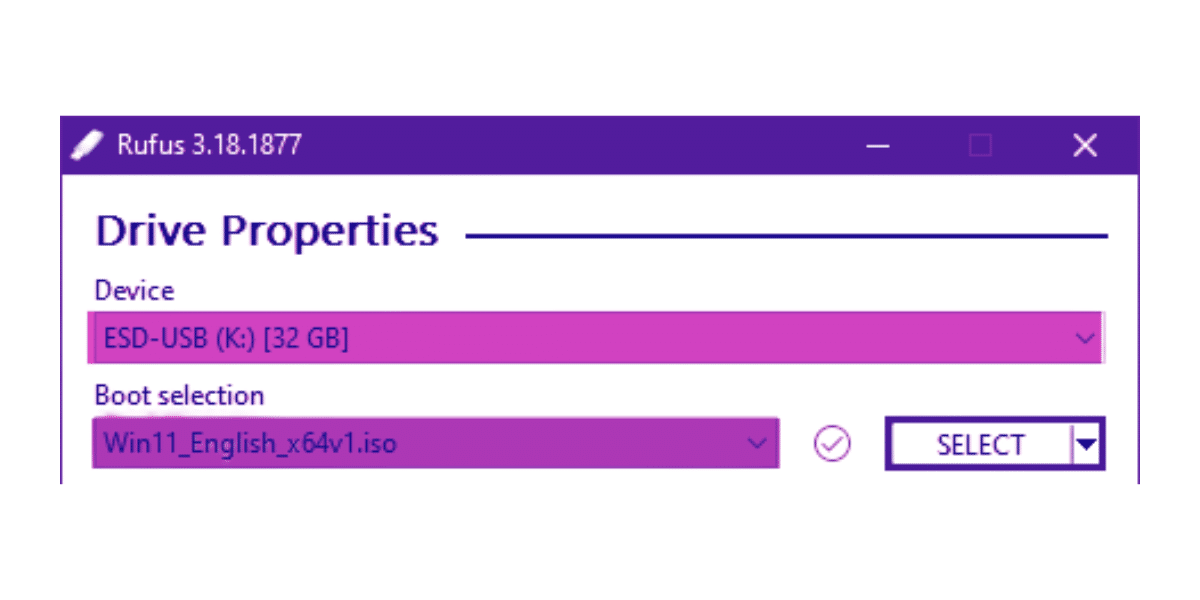
- Select the Windows 11 ISO file you downloaded in Step 2.
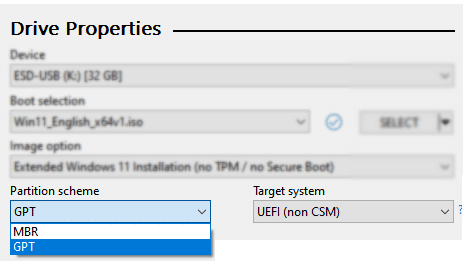
- Under the “Partition scheme” section, select “MBR” if your computer uses BIOS or “GPT” if your computer uses UEFI.
- Under the “File system” section, select “NTFS.“
- Under the “Cluster size” section, leave the default setting.
- Under the “Format options” section, select “Quick format” and “Create a bootable disk using” and select “ISO Image.“
- Click on “Start” to begin creating a bootable USB drive.
- Once Rufus has finished creating the bootable USB drive, restart your computer and boot from the USB drive.
- Follow the prompts to install Windows 11.
You may still see warnings or errors related to unsupported hardware during installation. You can safely ignore these and continue with the installation.
It’s important to note that installing Windows 11 without a TPM may compromise the security of your system, as TPM provides additional security features such as secure boot and device encryption.
Therefore, using this method only as a last resort is recommended, and consider upgrading your hardware to support TPM 2.0.
Conclusion
We hope this tutorial has helped you install Windows 11 on your unsupported CPU. If you enjoyed this article, please comment below and let us know your thoughts.
Remember to share this tutorial with your friends and family who may also need help upgrading their computers to Windows 11 on an unsupported PC.
To learn more about Windows 11, check out our premium offer for exclusive content and tips.