
Press the Windows key and print screen keys together to take a screenshot. Your screen will blink. It indicates that the screenshot has been taken.
MSI laptops are the most popular laptops among gaming enthusiasts.
Taking a screenshot is a part of our day-to-day professional or gaming experience.
You can take a Screenshot on your MSI laptop in multiple ways. We will cover all those methods in an easy yet comprehensive way.
There are four proven methods to take screenshots on the MSI laptop.
- To take screenshots with the PrintScreen key
- To take screenshots with the EaseUS Screenshot
- To take screenshots with the Snipping Tool
- To take screenshots with the Windows Logo +G
Method 1: How Do you take screenshots with the PrintScreen key?
Utilizing the Keyboard shortcut Keys to take a Screenshot on an MSI laptop is the easiest and most direct method. The PrintScreen key on the keyboard is designed to take screenshots directly on your MSI laptop via a single step.
The steps involved in taking a screenshot through the PrintScreen key are as follows:
- The first step is to launch the window or any other information; you wish to take a screenshot of. Open them in full screen.
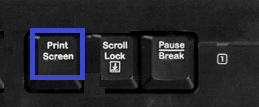
- Direct your attention toward your MSI Laptop keyboard. You will find the PrintScreen key at the top game bar of the keyboard. Depending on your keyboard, the hotkey can be named PrintScreen or PRTSC. Both are the same.
- Now, hit the Windows and the PrintScreen keys simultaneously. You will notice a blink on the screen. It is the notification that the screenshot has been successfully taken.
- The screenshots can be found in the Pictures folder.
Related Reading
- EVGA Precision x1 Vs MSI Afterburner
- How To limit FPS With MSI Afterburner?
- How To Record With MSI Afterburner?
- How To Unlock Core Voltage Using MSI Afterburner?
Method 2: How To take screenshots with the EaseUS Screenshot?
EaseUS screenshots are also easy to take screenshots on your MSI laptop. EaseUS is Screen Capture software. The software can be used to screenshot the complete screen of your laptop or a part of it. This way, the user can decide which portion of the screen he wishes to Capture.
As compared to the conventional method of capturing screens, EaseUS also provides its users with other editing tools that can be used to modify the captured screenshots. The tools include: drawing lines, inserting mosaics, and many more.
The main features of the EaseUS software are:
- User-friendly layout
- Any part of the screen can be captured, depending on the user’s requirement.
- The saved screenshots can be edited via the EaseUS editing tools.
- The screenshot can be pinned on the screen for further work.
The steps involved in taking a screenshot through the EaseUS Software Are as follows:
- Download and Install EaseUS software on your MSI laptop if you have not installed it.
- Launch the Screenshot Software on your MSI laptop.
- The toolbar of EaseUS contains two sections.
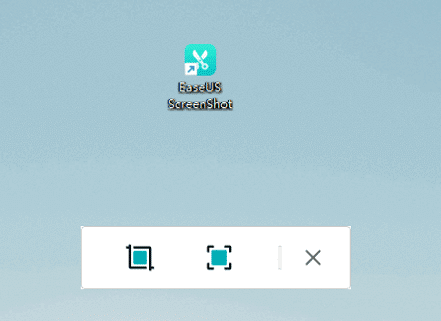
- You will find Rectangular Screenshot on the left side, and on the right side of the toolbar, you can locate Full Screenshot.
- Want to capture a part of the screen, hit the Rectangular Screenshot. You can also Double Click the Ctrl key to capture the partial screen.

- To take a screenshot of the Full screen, hit the Full Screenshot or Double click the Alt button.
- After you capture the screenshot, you will find the Editing Toolbar under the captured screenshot. The toolbar comprises different editing items that aid in modifying the captured screenshot. The toolbar contains drawing lines, adding text, inserting mosaics, and many more.

- After modifying the screenshot, hit Save or click on the Space button to Save the captured screenshot.
- If you want to Copy the screenshot, hit Copy or press the Enter key.
Also, Read
- How To Change Input On MSI Monitor Step By Step?
- How To Overclock GTX 1070 With MSI Afterburner?
- How To Enable The Fps Counter In MSI Afterburner?
- How To Factory Reset The MSI Laptop?
Method 3: How To take screenshots with the Snipping Tool?
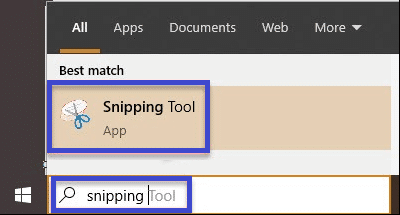
Windows 7, 8, Windows 10, and Windows 11 have free built-in Screen-Capture software. The built-in software is known as the Snipping Tool. The tool provides options to the user either to capture the entire screen, a portion of it, or a specific window.
The steps involved in taking screenshots with the Snipping Tool on the MSI laptop are as follows:
- To launch the Snipping Tool on your MSI Laptop, search the Snipping tool in the search bar.
- To capture the screen, open a new tab. Press your Mouse on the left side while holding it there. After that, rotate your Mouse on the portion of the screen you wish to take a screenshot of. As you do it, release your Mouse there.
- The Snipping Tool will take a screenshot of that portion of the screen.
- To Save the screenshot, hit the Save Snip icon, add a file name to it and choose the location where you wish to save the Snip.
Method 4: How to take screenshots with Windows +G?
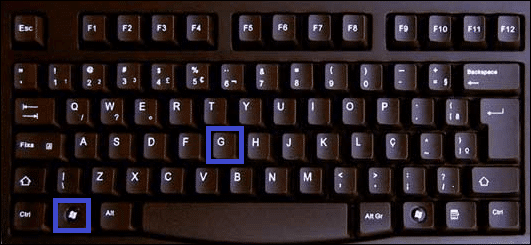
There are a few other Shortcuts or Hotkeys that can take a Screenshot on your MSI laptop. One of those hotkeys combinations is Win+G.
Gamebar gets awake once you hit the Win+G keys, through which a user can capture screenshots. The keys work on all laptops to take screenshots.
The steps involved in taking screenshots with Win+G on Your MSI laptop Are as follows:
- Open the screen or the window you wish to take a screenshot of.
- Then, click on Win+G simultaneously to wake Gamebar.
- Select the Screenshot option from the multiple windows to take screenshots on your MSI laptop.
- You can then access the screenshot from the Screenshot folder.
We have comprehensively covered how you can take screenshots on your MSI laptop. However, utilizing the hotkeys of the MSI laptop keyboard is the easiest way to capture screenshots.
Also, Read
- How To Record With MSI Afterburner?
- How To Unlock Core Voltage Using MSI Afterburner?
- Do I Need to Uninstall Old Graphics Drivers Before Installing A New Graphics Card?
- How To Overclock GTX 1070 With MSI Afterburner?
- Best Way to Maximize Crypto Mining Profitability?
Conclusion
I hope it was a fun learning experience for you. We have explained all the methods to take screenshots on your MSI laptop easily yet comprehensively.
In modern times, taking screenshots has become a day-to-day affair. With the specific keys and tools, you can quickly capture the screen or any part of it.
With tools like EaseUS, you can further edit the screenshots as well.
If you enjoyed reading this article and want more such knowledge-packed pieces, let us know by commenting in the comment box. Stay connected!